At ZEFR we are using Pivotal Tracker to help us with our Agile workflow. Its a great tool, but we created a couple of command-line utilities that help us with our process. We have found these to be real time-savers and helped up tighten up our process.
We have collected these utils into a python package pivotal_tools. The 4 most useful utilities for us are:
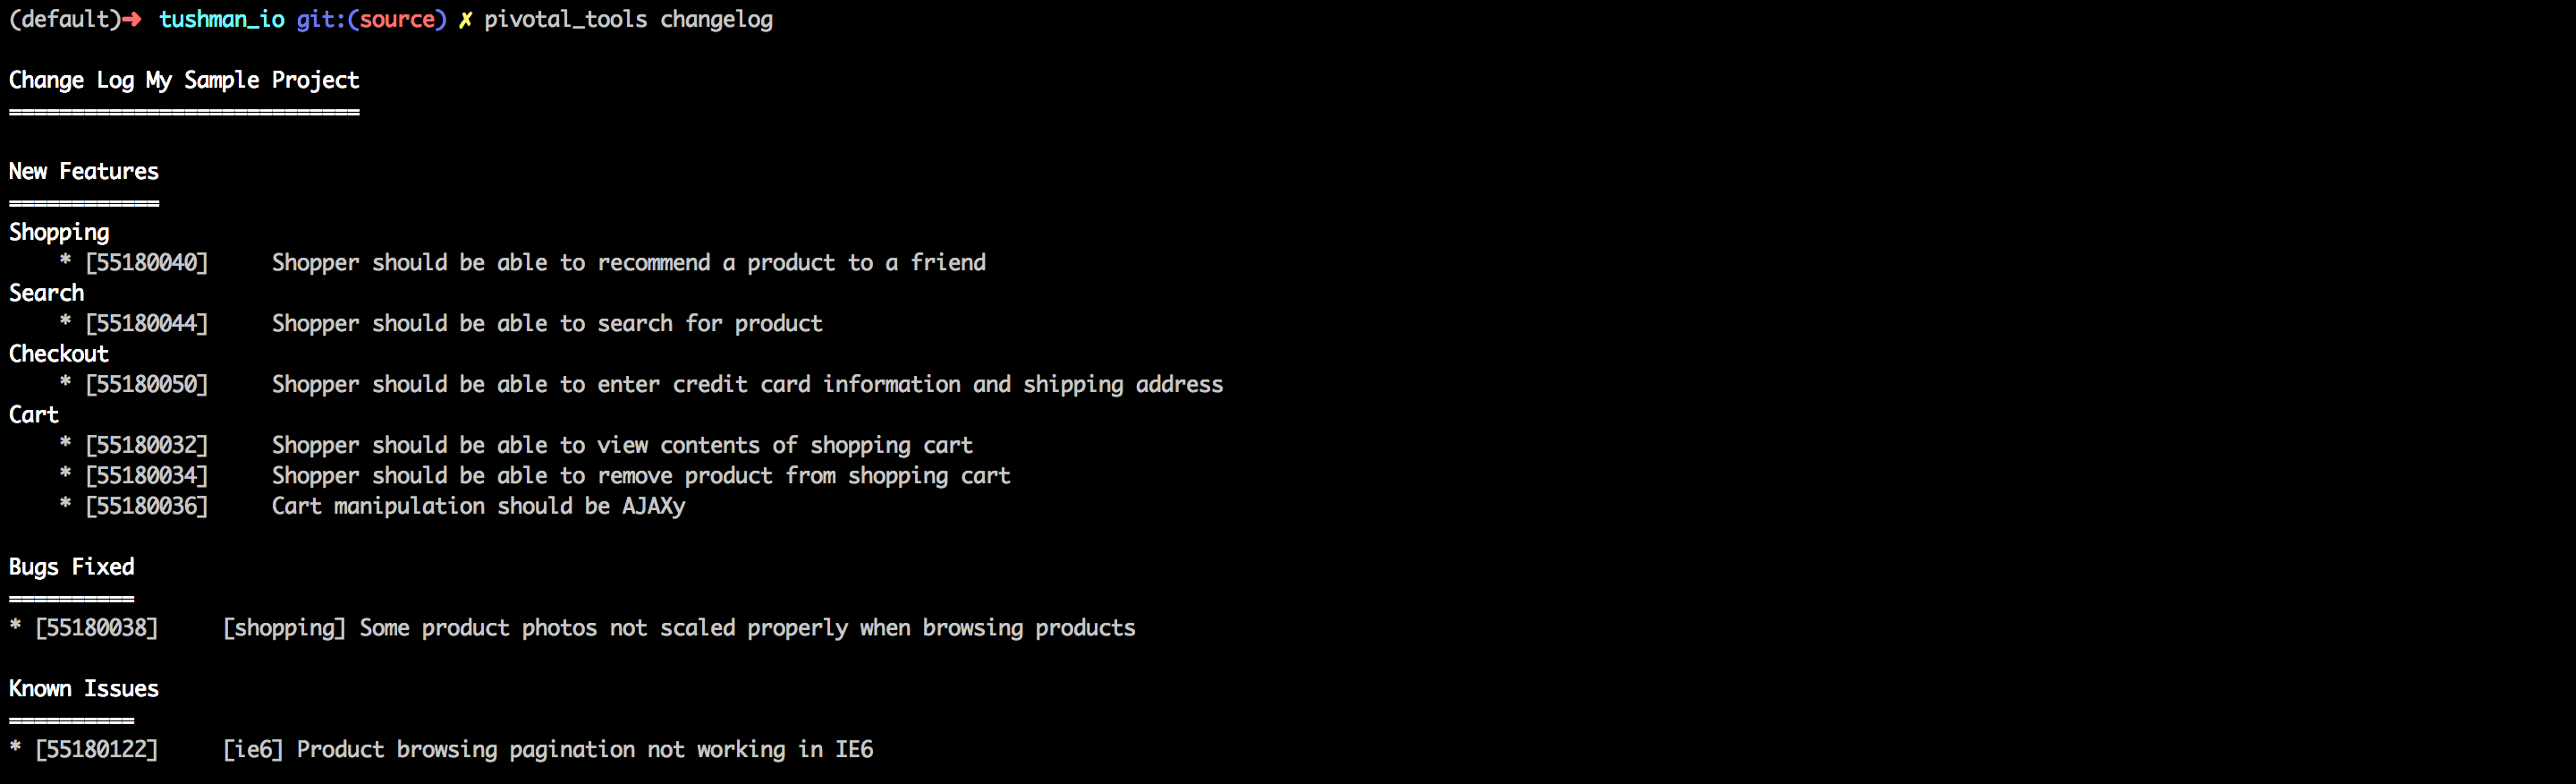
pivotal_tools changelog: generates a changelog for all of delivered stories
pivotal_tools create (bug|feature|chore): creates an a story
To install:
Install
1
pip install pivotal_tools
If you are a screencast person — have a watch (5min), alternatively there are screenshots and descriptions below the fold:
Sample Project
Lets say you have project like the following:
pivotal_tools show_stories
Lists the top 20 stories. Useful if you are looking for what story to pick up next
pivotal_tools poker
also can be run with pivotal_tools planning. Iterates over your unestimated features, giving you a minimalist view of the feature. Prompting the team for an estimate.
pivotal_tools scrum
We use this tool for our daily scrum. Simply shows what each member is working on.
pivotal_tools changelog
During the release process, we use this to generate a change log that keeps our business owners in the loop. We also use this during our scrum, to see what has been delivered in the current iteration.
Feedback
Hopefully this will be a useful utility for others. Feel free to fork and comment. The repo is on github (here)
(I’ll give you a hint — it’s not down-voting, or one-liner emails)
tl;dr: Preface your constructive feedback with a compliment. And end the conversations with additional positive feedback. Make the negative feedback precise and timely
First, here is my FAVORITE clip of a boss giving his employee feedback
Everything you’re doing is bad, I want you to know this
We engineers, for whatever reason are a sensitive bunch. We are internally programmed to strive to get the acceptance of others. Whether its gaining cread on StackOverflow, Getting up voted on Reddit, or more frequently, trying to impress your boss and peers.
We can take it as fact that giving and receiving feedback is a Good Thing.
But if it is not presented well, it can have some unnecessary consequences. What we want to happen is have the person receiving the feedback, process it and hopefully take it to heart.
What we do not want to happen is to make the receiver get defensive or feel bad.
What works for me (and for others) is to wrap the constructive feedback with positive feedback. For example:
Jonathan, you clearly have been putting a lot of work into your blog. It has some really great ideas in here. I particularly liked your article about buying socks.
But, everything you are writing about has been written about already. Have you seen this New York Times Article about giving feedback — its pretty solid? I recommend doing a bit more research before posting
I do really enjoy your posts, and I look forward to reading more!
Just as important, is the timing of the feedback. Don’t wait until your quarterly review. If you have a way that a colleague could run a meeting better — tell her right afterwards. Try to build a culture of real-time feedback.
Now, this is not a silver bullet. I have also heard this approach called a “sh*t sandwich”. And if it is used too much — or without sincerity, it will not be effective. But, I think its a good arrow to put into your feedback quiver.
And just because this is a engineering blog …
feedback.py
12345678910111213141516171819202122
fromrandomimportchoicebeginning_affirmation=["I like what you are doing here","Nice use of a context manager, you should share that with the rest of the team","I can not believe how much you have accomplished already"]ending_affirmation=["Dude, I am pumped the direction this is heading","Really good work","Hey, lets grab lunch",]defconstructive_feedback(feedback):return"{} but, {}. {}".format(choice(beginning_affirmation),feedback,choice(ending_affirmation))# and so …printconstructive_feedback("More cowbell")#yields: 'Nice use of a context manager, you should share that with the rest of the team but, More cowbell. Hey, lets grab lunch'
tl;dr: Use pip, git(hub) and tags to share packages privately amongst your team
Problem Statement We have libraries that we need to share across multiple applications. Using Git submodules, makes me cry — there has to be a better way (and there is)
I am going to break this up into three sections:
Packaging Python (this needs to happen regardless of how you share)
Okay, you wrote an amazing utility and want to share it with the world. I really was blown away how easy it was to do this with thanks to PyPi (Python Package Index) (aka the Cheeseshop)
For this example, I wrote a package called human_dates That takes some of the syntax sugar from the ruby and rails world and brings it over to python land.
fromhuman_datesimporttime_ago_in_words,beginning_of_dayprinttime_ago_in_words()#prints "just now"printtime_ago_in_words(beginning_of_day())# prints 8 hours ago
AWESOME! I really enjoyed this experience. I found the overhead very light for creating reusable components.
Also — if this still sounds like to much work for you — the least you can do is just write and share a gist of your snippet.
Sharing in the private domain (within your company)
Okay, now things get a bit more interesting. You have a key component that is used in multiple code bases. What is the best way to share that. But we need to, a la Gandalf: “Keep it secret, keep it safe”
Our Requirements:
The sharing should be done via pip, and the requirements.txt file
I do not want to set up my own pypi server
It needs to be secure within our organization
But, needs to be deployable to 3rd party PaaS providers like heroku or elastic beanstalk
To accomplish this, I am using pip’s ability to interact with git over ssh. That and git tagging. Here are the steps that I took …
Create a private git repo (I am using github)
Make your package, just like we did before. For this example I will share piece of code that I use to inspect into dictionaries. here is the project (note: its public to share with you guys — but it the real use case it MUST be private.)
push to github. It needs to have all the same trappings of a python package you would push to PyPi
When working with git and pip, you need to go through an additional step of explicitly tagging your versions
12
git tag -a v0.1.0 -m 'version 0.1.0 initial version'git push --tags
For YOU to install the most current version from HEAD, we can now do the following:
At this point, your colleagues and deployment machines WILL NOT be able to access this package
Time to provision them …
For your colleagues to access this library:
First they will need to have access to your github repository. So make sure you have added her/them as collaborators. Best handled on the github website
They will need to turn on ssh agent forwarding. Following instructions (here)
For your deployment machines to access the library. You will need to follow the following two steps:
Add the ssh keys to your deploy machine. If you are using heroku. Its as simple as this
Note: As an alternative you can host your own secure PyPi server.
What I really like about the GitHub approach is ( a ) all of the ACL heavy lift is handled by GitHub, and ( b ) they are responsible for keeping their server up.
Cool — this is working for me. Love to hear others thoughts and successful approaches.
Other interesting articles while researching this …
All in all it was pretty simple to get my flask app up and running on Elastic Beanstalk. I ran into a couple of gotchas, and wanted to share them to save others some time.
I relied heavily on two tutorials to get going my first app up:
No console concept (eb run python —> and get an interactive python console)
Currently Beanstalk only supports python 2.6
For now the only real option is to make sure your web app runs on 2.6. I do not think thats critical, and I am sure in time they will upgrade to 2.7 and gasp maybe 3.0. But if you need to run a higher version — you will need to look to another solution (ec2 or heroku).
To get your localenv to run 2.6, make a virtualenv like so …
If you are on a mac, you can use brew to install the elastic beanstalk cli (ironically you need to have python 2.7 or 3.x installed on your machine)
brew install aws-elasticbeanstalk
To Check out the logs
You have a couple of options to check out the logs:
using the CLI, eb logs
going to the web console, navigate to logs, and hit ‘Snapshot logs’ (docs)
I found the that formatting of eb logs in the console to be pretty unreadable. The code is found here (couldn’t find it on github). If I find I rely on this a lot I will probably rewrite this. I think the main issue is three fold:
They probably are giving us too much info. They provide us separate logs from the following sources:
/opt/python/log/httpd.out
/var/log/httpd/error_log
/var/log/cfn-hup.log
/opt/python/log/supervisord.log
/var/log/eb-tools.log
/var/log/httpd/access_log
/var/log/eb-cfn-init-call.log
/var/log/eb-publish-logs.log
/var/log/cfn-init.log
/var/log/eb-cfn-init.log
Each log is presented in a different format (I know why thats the case — but still)
And I think they are simply running tail -n on each each of these files. So you get the last n rows for each file, presented separately. What I really want to know is what just happened or even better — what is happening right now (tailing). AND to have all of these logs files interlaced and prefaced by its source. Something like:
I was unsatisfied with out-of-the-box solution that mongoengine gave me for managing indexes. What they offer is adding some meta information to your model, and then it litters ensure_indexes when making calls. There approach is shown here
I find that I need more finegrained control of defining indexes, and more importantly when to kick off there creation.
So I added an ensure_indexes() method to my manage.py, and then dropped down to pymongo to get the control that I want
It looks something like this …
manage.py
1234567891011121314151617181920
frompymongoimportASCENDING,DESCENDINGfrommongoengine.connectionimportget_dbimportdatabase@manager.commanddefensure_indexes():database.connect()db=get_db()vt_collection=db['video_test']vt_collection.ensure_index([('video_batch',ASCENDING),('video_total_views',DESCENDING)],background=True)vt_collection.ensure_index([('video_batch',ASCENDING),('video_name',ASCENDING)],background=True)# show index info:forcollection_nameindb.collection_names():print"Collection: [{}]".format(collection_name)col=db[collection_name]printcol.index_information()
I like using mongoengine’s get_db() method to get a handle on a pymongo database object, it centralizes the connection logic which I keep in my database.py file, which for completeness is here:
We all know using the mouse is a productivity killer. So is shopping for essentials like socks and underwear. Here is a solution to both of these problems.
Zappos Labs just released an awesome new CLI for us developers to keep our eyes on the prize.
To use it is simple (you do need to be running ruby 1.8.7 or greater. Install instructions here).
> gem install zappos_cli

> zappos configure
zappos configure just created a template preferences file in your home directory (~/.zappos)
Update the preferences file with your zappos credientials and some preferences (you will need to have an account set up online with your shipping and billing preferences). Typically it looks like this:
You just ordered some socks! Nice! (note: the current version only supports following items: ['socks', 'boxers', 't-shirts', 'jeans', 'shoes', 'hoodies'] Enough to keep us hackers clothed.)
Really impressed with the ascii art — they are sweating the details.
Want to see the status of your order:
> zappos orders:status
Want to track your order:
> zappos orders:status --tail
I like to keep this open in a tmux pane, and I can realtime see where my socks are.
Don’t like your socks. No worries. Returns are easy:
> zappos returns:new --order=ORDER_NUMBER
This will generate a pdf return label and return instructions. note: ORDER_NUMBER comes from running zappos orders:status
The zappos_cli is in beta right now. But I have found it invaluable. Give it a shot!
JUST KIDDING!!! But this would be sooooooooo awesome Make it happen @ZapposLabs!!
tl;dr: Like the apple store, we should have an easy way to pay $1 to use a piece of software. I think Github should help us do that
I went to a really greate Python Meetup last night where Kenneth Reitz (@kennethreitz) did his Python for Human’s talk. Really interesting talk, worth watching (link).
@kennethreitz is, among other things, the author of the requests library for python. On one of his slides, he mentioned that his open-source requests libary has been downloaded 4MM times. I that got me thinking …
Kennenth Reitz should be a millionaire
Now, maybe he is. But I doubt it. But he should be. Here’s how …
So I pose a question to you developers out there:
Whould you pay $1 to use the requests library? Whould you pay $1 to use Flask? Rails? etc …
I know for me, the answer is Hell Yes! if (and here is the important part) it is really easy, and headache free.
Here is my proposal …
GitHub should open the “Dollar Store”
There are a lot of details that need to be worked out. But here is the general work flow:
Kenneth clicks a button on his requests project and says — “Enable Dollar Store” (note: that the project can still be downloaded for free as normal)
I go to my github account, and click ‘support the Dollar Store’
Now the first time I pull down a project from gibhub with my ssl_key or what have you, if that project is in the dollar store GitHub charges me a dollar and gives it to that project owner
Organizations as a whole can also support the dollar store. I can have all of ZEFR support the Dollar Store.
Pretty soon, Kenneth will be a millionaire and will be able to afford the laptop of his dreams.
I know this open a can of worms (Haters gonna hate):
How do you allocated funds among many commitors?
Copyright(left) issues (This is probably the biggest hurdle now) — But I believe surmountable
But I think these are all details. Fundamentally there is money out there that wants to go into smart engineers pockets — and we should find a way to greese the wheels, and make it easier for that to happen.
I really think that something like this will be great for innovation. It will spur more people to contribute to “OpenSource”
In the meantime there are some alternatives to support projects like these:
Gittip (right know Kenneth makes about $4,000 year for this work)
File this under, something I want, but not going to build …
Had another idea in the shower this morning (all of my ideas happen in the shower).
Problem Statement: What is an easy, non stressful way to communicate what we are working on cross coasts. And for me the most important aspect of that is what are people struggling with, and does someone else on our growing team have knowledge to help them.
For example. I was working to set up flower to monitor celery. I mentioned that to Marc, and he said, “I had a really bad experience with that. It caused a pretty significant memory loss”. Really good to know.
There a bunch of tools out there, some that we use, and some that we don’t, that solve parts of the problem:
GitHub: What changes have I made to the code base(s)
IDoneThis: (we don’t use this) But it is a cool (but IMHO overpriced) tool that you simply email a quick email on what you did today.
My idea I am calling Mailing It In™. This is what I want it to do:
Everyday you send a markdown formated email to mailitin@zefr.com. I need to think about this more, but I think we just need to answer two questions:
What am I struggling with:
I learned this cool thing:
What you are working on will be automatically taken out of pivotal
At Noon every day an digest email will be sent out to the entire team (similar to the daily scrum)
A weekly summery digest email can also be configured
All of this content will be posted in a Jekyl blog hosted internally at ZEFR. This site will have the following features (most coming for free from Jekyl or Octopress):
Problem Statement: What is the simplest was to deamonize a serivce (Celeryd)on Ubuntu.
I am relatively new to Unix sys admin tasks (I have been relying on heroku to handle all of that for me) But I ran into a problem where I could not rely on that paradigm. I thought it was going to be really easy to do. But it ended up taking me a lot longer then I expected. Hopefuly this post will help someone in a similar situation.
There are a handful of unix initialization options:
I tried all three, and really the only one where I am not throwing up in my mouth is Upstart. This should be your default choice if you are running Ubuntu
Let me jump to the final solution, then I can go into the finer points
1) Create an init script
# This goes into /etc/init/celeryd
# celeryd -runs the celery worker as my virutal env user
#
#
# This task is run on startup to start the celery worker

description "runs the celery worker"
author "jonathan tushman"

start on runlevel [2345]
stop on runlevel [!2345]

# retry if ended unexpectedly
respawn

# limit the retries to max 15 times with timeouts of 5 seconds
respawn limit 15 5

# Time to wait between sending TERM and KILL signals
kill timeout 20

chdir /home/ubuntu/apps/money
exec su -c  'FLASK_ENV=production /usr/local/bin/celeryd --loglevel=info --concurrency=1 --logfile=/var/log/worker.log'
F*ck thats it. (I hate how simple this solution is once you figured out how to do it)
Now you are able to execute the following commands:
The main thing that haunted me, was once again Unix permissions
(One day, I am sure I am going to say — man! Unix permissions are awesome)
The most important line in the init script is the exec line:
exec su -c 'FLASK_ENV=production /usr/local/bin/celeryd --loglevel=info --concurrency=1 --logfile=/var/log/worker.log'
So what I learned here is that sudo has its own environment variable space. So even if I set the FLASK_ENV environement varable above in the script, it wouln’t be applied. So you need to use su -c which will execute the given string as super user. Check out this StackOverflow post for more info.